The Medusa is our line of tools to play with the EFI ROM. The tool you need when repairing boards and you want to see the serial number or the firmware version without putting the board in a Mac or when you forgot your EFI PIN and locked yourself out of your Mac.
It is incredibly easy to use. The built in LCD display will show you what is going on.
1) Display info from the EFI ROM:
ROM chip model, ROM chip size, Mac Firmware version, ME version, EFI lock state, Mac serial Number, production date and time... and many many more options!
Click on the link to learn more...
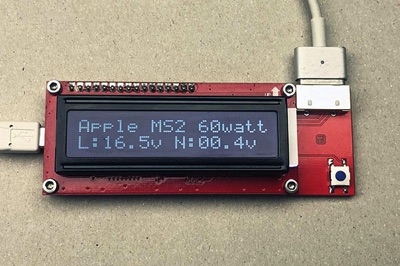
The CMIzapper MagSafe Tester is a small tool for the repair workshop. It is especially useful to show the customer that their crappy charger is in fact a crappy charger...
You can connect any MagSafe (1 or 2) power adapter to this tool.
This tester will show you if it is a real Apple or a fake Chinese adapter!
It will also show the output voltage both with and without load. A decent (read Apple) adapter will have a no-load output voltage of about 6 volts or less and will only turn on the full voltage of about 18 volts once it 'smells' that it is connected to a MacBook.
The big idea with this tester is that you plug it into any laptop or motherboard (Apple or Windows) you are repairing. With one second of extra work it will give you all sorts of extra information about what is going on with the device, and sometimes it will save you big-time. For example you will aware of when the board is powered so you will not plug or unplug the internal LCD cable by accident with the power still on. Also differentiating between a machine that turns on but shows no image and a machine that does not turn on becomes trivial.
This is a simple but extremely useful tool for anyone repairing computers and laptops. It has 3 lights showing power and USB activity, and it offers a versatile connection to the GND line of the computer.
Click on the link to learn more...
This is a simple but extremely useful tool for anyone repairing computers and laptops.
It has 3 lights showing power and USB activity.
The VBUS LED (red) is connected straight to the VBUS line and will light up whenever power is present. On USB-C ports it is the responsibility of the CD321x chip to turn the 5v on, this light implies that the the CD321x is at least partially working.
The USB LED (green) will blink whenever there is activity on the USB bus. As the USB bus on a computer is driven by the PCH, this will indicate that at least the PCH and probably also the CPU is running.
The 5volt LED (red) will only light up if the VBUS voltage is correct i.e. if it is below 4.75 volt it will be off. Above 5.4 volt it will blink to draw your attention to the danger that USB-C port would be to anything else you would plug in there.

A4614 Chipmunk universal HDMI Tester
Including shipping (world wide)
56 EURO.
The Chipmunk HDMI Tester has become the most popular way to test HDMI ports on gaming consoles, although it will work equally well on normal computers. It is a simple tool to see if an HDMI port is working, and to give you feedback if the HDMI port is supplying an image without connecting a big HDMI monitor.
You want to buy our HDMI tester because it shows you if and how the HDMI port is interacting with the (emulated) monitor. This in big contrast with other testers that only show continuity for the individual lines of the HDMI port.
Works on all HDMI ports including on gaming consoles and video cards.
Has LEDs for the following:
Power - 5 Volt - EDID - Data (4 LEDs)
All LEDs are mirrored on the other side of the tester so you can always see them from either side. MORE INFORMATION

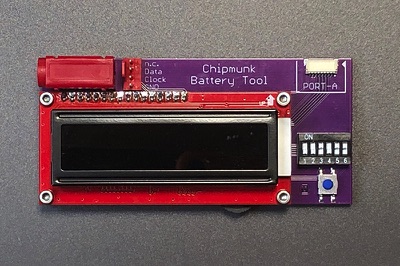
The Chipmunk Battery Tool is an easy to use tool to see many interesting things about an Apple Battery.
It does many things:
1- Shows the Cycle Count
2- Shows Serial Number
3- Shows Capacity that the battery still has left
4- Shows if the 'Permanent Fail' Flag has been set, plus the reason why it has been set.
One of the uses is to distinguish between batteries that are dead and ones that are merely very discharged. If you charge a severely discharged battery VERY carefully it is often possible to bring it back to life. Within the Mac this will not happen because the Mac will only charge the battery once it can talk to the battery, but the discharged battery will not talk until it is charged (a little bit).
Visit our Youtube channel for a video showing this Chipmunk Battery Tool in use.
This tool can also write some parameters into the battery. It can set the cycle count as well as the 'original' capacity. The health of the battery is the current capacity as compared to the original capacity. So lowering the 'original' capacity would give a higher percentage for the health.
This Chipmunk Battery Tool can also clear the Permanent Fail (PF) flag in case it has come on. This might or might not fix the battery depending on the reason that the PF got set. If it got set because the battery was discharged too much or because you accidentally short circuited the battery briefly it will come back to life. But if, for example, the PF flag is set because because one cell is dead, resetting the PF flag will not solve the problem obviously, and the PF flag will probably come back on a few seconds later. MORE INFORMATION